Thursday, December 22, 2011

BP7_My RILS Plan

Hello My blog world friends, its me, Tracy, and  I realized that I made a extremely bad mistake and didn't post my very own RILS project to my site.   While it is late here it is what I worked on this month:

I call this RILS plan Let's Collaborate with Skype.

Brief Overview:
Are you tired of talking on the telephone? Are you tired of staying at work late? Do you feel like there are never enough hours in the day to tell your co-workers or friends everything they need for those last minute lesson plans. Why not try using Skype. This RILS project was used to introduce the possibilities of collaborating with co-workers and educators across the nation by utilizing a networking web 2.0 tool Skype.
Target Audience:
Adults
Objectives
At the end of this scenario the learner will be able to analyze how:
1. Create a free Skype account
2. Create a network by adding contacts
3. Understand how to navigate the Skype screen, share contacts and the upgrade options
4. Make test calls (communicating) to networks of family, friends and coworkers using Skype
5. Create Skype to Skype calls with single or multiple call locations
Procedure:
1. Learners will type www.skype.com in the address search window and create a Skype account by selecting "join Skype".
2. Learners will choose the download Skype and follow the directions to register and set up a profile and save Skype on computer.
3. Learners will then double click the Skype icon on the desktop to open Skype and select contact from the tool bar "Add Contact"; type desired contact name or email address and then send the request.
4.Learners will place or accept Skype to Skype calls selecting the hide or display video option.
5. Learners will experiment with screen, contact sharing and become familiar with the option available.
Emergent Technology:
Skype http://www.skype.com Web 2.0 tool that enhances a users ability to place and receive video calls from their very own computer.
Social Participation/Learning:
Skype can bring people together by using video conferencing and the great thing about it is that it's free. This is a user-friendly tool and can be easily comprehended to engage collaboration. Using the web 2.0 tool Skype will also give individuals an opportunity to communicate with others outside of their immediate area.
Making Connections:
he learners will have the opportunity to network and communicate effectively with co-workers, friends and family. This amazing web 2.0 tool can be shared very easily by email invitation or contact request. Skype is similar to using a regular telephone for communication but it gives you so much more. You can actually see the person you are communicating with via video. Learners after making initial contacts can search for other individuals in the surrounding areas or nations who are also Skype users to create a network for collaboration for business or personal interest.
Create/Produce:
The goal of this RILS is to create an avenue for collaboration amongst family, friends who may be new to using web 2.0 tools. The end product will be a created account and contact within Skype.
Assessment:
The outcome for each learner will be dependent on the individual persons goals and specific need. By using this RILS, collaboration will be much easier by using this web 2.0 tool. A checklist will be used to assess the individuals learning of how to utilize this tool.
Reflection:
The teacher can reflect on any troublesome issues that came up in helping their co-workers, family and friend with creating a Skype account. The learners can reflect on what the process was for them in creating a Skype account and making a video call from their computers. Learners will also reflect on how the tool can be shared with anyone.
List of Materials:
computer with internet
USB connection camera
paper
pencil
I can not believe I have been so wrapped up in spending time with my family that I forgot to get this on but thanks to my classmate Devloun for looking out for me.  I am just overwhelmed these last few days. Keep me uplifted blog worlders I need it now more then ever. Until later have a safe and joyous holiday blog with you later.

Tuesday, December 20, 2011

BP8 Links to Comments

Follow this link to my comments on Tessa RILS project.


If your want to see more follow this link to my comment on RILS project Story Jumpers web 2.0 tool.

Saturday, December 10, 2011

PE5_Skype

Ok my blog world friends I am back.

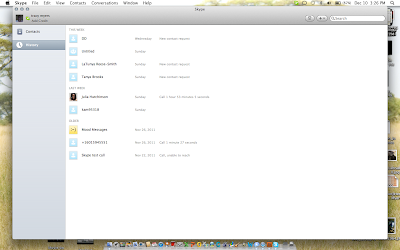
This time I am continuing my reflections on the web 2.0 tool Skype.  I have had a few conversations via Skype with some family and friends.  My purpose for using this tool is to continue to build more avenues to collaborate and communicate with my co-workers and friends.  I have found that using Skype can enhance the process of collaboration when you have built a network of people to communicate with via Skype.  The first hassle is to convince enough people to create this user free account.  Once this is done you can begin to build up your network of friends in your contact.  I like the ease of having the camera feature on the computer for the video share.  I have a small video that I created of my actual conversation I had. What I am attempting to show in this video are some of the other cool features Skype has to offer.


 So what do you think? I like the picture in picture feature on the screen.  I like the instant messaging feature as well.  Its truly am excited about all the possibility that this tool has to offer. Next step pulling in co-workers who are afraid of online anything.  But I believe I can do it because Skype can be a great enhancement tool.  Utilizing it can take the place of school district meeting board meetings, professional development off campus   or staff meeting. These are just a few ideas that come to mind.


Some additional issues or shall I say hassles that may be of concern could include camera image distortion. I found that while video chatting with Ms. Brooks there were issues with video quality, distortion in the audio.  However the over ability of this tool is so great.  Having a sense of being able to multi-task in your own space or work (depending on how your district may be set up to for internet capabilities) in my opinion the pros out weigh the cons.  


Well I am signing out for now, time to cook, I will blog with you guys later. For now take care 

PE4_ Skype

Hello my blog world friends its been a little while but I am here. For my Relevant and Innovative Learning Scenario(RILS) project I had an amazing opportunity to do some playing around with a new communication tool.  I found out about Skype after attending a Professional Development and over hearing some people talking about video conferences.  So me being the person I am I made time  to play around with this web tool -Skype.

After creating a basic account I was able to make a few interesting discoveries.  I would recommend anyone with loved ones across the country or world to create an account to keep in touch.  I have it to be an amazing tool to use in communicating with my family so far.  I am still trying to get some of my coworkers to get on board with Skype.   I have made a plea to them about this fun new way to communicate, however the jury is still out for them.  While I have made a few connections with old classmates from years ago, who are also educators,  and also some family members my reason for wanting to use this web tool is to build on collaboration within my team.  


As I said collaboration is my main focus for this tool with my coworkers, but after making a few pleas with them on setting up a free account, I have discovered that part of the issues they have are with basic usage.  One of my coworkers has informed me that she isn't comfortable with using the internet because she doesn't feel it is safe.  Another issue I have come across is accessibility for everyone.

In trying to get everyone online at the same time so that we can play around with the Skype is very difficult.  Although this tool is amazing to use, without people interested enough to try you could  very well end up like me with out participants for participation.  Well its me, Tracy signing out until next time. Take care and please continue to follow my journey as I blog my way into technology. Yea me.... Until later.

Sunday, December 4, 2011

BP6_Michael's Wordle

I enjoyed Michael's blog post this week on web 2.0 tool Wordle.  Follow this link to my comments on Michaels blog about Wordle.


BP5_Karen's Yaca Paca Tool


Hello my blog world friends, its me Tracy raving about what Karen found this week.

Karen found this amazing Web 2.0 tool called Yaca Paca in her search for new and exciting things this week.


Follow this link to karen's blog and find my comment on her amazing Web 2.0 tool.
Thanks!

BP4_PhotoPeach


Hello my blog world friends, it me yet again.

Today I want to  share with you my latest find.  I have discovered PhotoPeach as an interactive tool to use.  I took some of my photos from our class try to the Pumpkin Patch this year and uploaded them in PhotoPeach. Now this produce is user friendly however I was a little disappointed that after my many hours of playing around on it today I am not able to share my finish work with my blog world friends. But let me tell you why,  after reading all of the jargon that the site has I discovered that in order to download projects you have to be select the premium account which is a PAID account. Now keep in mind my blog world friends its relatively inexpensive for educators merely $9 a month however then you think about it thats quite a steal. But because my pockets are low I am not able to afford this luxury right now.  :( Thats my sad face.  I guess if I had paid closer attention to the information instead of playing around with on the site I could have saved my self the heart ache and trouble.  But I am encourage, I will get the money to upgrade my account to a class premium one day and I will surely share those story and spiral presentations I created.  For now I can display some of my many screen shots of my tour in PhotoPeach.  I would encourage anyone looking for a creative way to display your photos to use PhotoPeach.


 You can see from this first screen shot the ease in setting up a free account with PhotoPeach.  Photos can be added very quickly. Which is always a plus for me.


This is a screenshot of my video I created with a few of my uploaded pictures from our class trip to the Pumpkin Patch.  Can you see the look of excited and fear on my babies faces.  We were on the back of  a very long and raggedy trailer touring the fields.


One of the cool features on PhotoPeach is the easiness to add your creations to social media however this feature is again reserved for those individuals with the class premium accounts for educators.
I would encourage any of my blog world friends to check out this amazing site especially if you have pictures that you would like to turn into a creative story.  Well I have to say goodbye for now.  Blog with you later.

Saturday, December 3, 2011

PE3_iMovie

Hello my blog world friends, yes it is me again. 


I am coming to you live from my couch where I have been relaxing and editing my video.  For this post I have contemplating how to produce my desired product that I attempted to create while playing around in iMovie and watching the tutorial. One thought that came to mind was me capturing some of my life outside of school. Then I thought about how I should capture my hectic day to day schedule.  But then my brainchild said why not reflect on all these things together so at the end of this blog you will see my end results.  While it was extremely fun playing around in iMovie I do know that I will have to view a lot of the videos over and over again from Lynda.com because of the vast amount of information. Its simply too much for me to retain within one week. 


You can click on the link below or you can double click the play button on the youtube video that is embed in this post to check out my project.


I have to say bloggers iMovie is a very user friendly program.  What I tried to demonstrate in my video is a sample of the different tools I was able to remember how to use. 


 I added still shots to my presentation as well as background music from iLife Sound Effects and iMovie Sound Effects.  I hope you enjoy what I have attempted to show as my course of understanding and knowledge gaining. 

I hope you enjoy what I have attempted to show as my level of understanding and knowledge I have gained so far with iMovie.  


Well I am signing off for now. I hope you were able to learn something from my tour of iMovie. Come back soon as I continue my journey.  Hope to see you soon.

PE2_iMovie


Ok my blog world friends my journey continues part 2.

I have been reflecting on all this of information that I have seen repeatedly.  The wonderful thing about this tutorial is you can watch it over and over and over until you get it. Which is what I have done for the last 2 days.  I finally understand how to create effects in iMovie with my very own video. What I have learned is how to adjust the speed and zoom within a frame as well as how to crop a video. I had no clue you can do all of these things using iMovie.  I am still not sure how to use the green and blue screen effects but I am determined to get it.  At this point my tour in iMovie focuses on the chapters seen below


Garrick explained how to add titles and change fonts to the video. One area of concern for me is creating a much smoother transition between each segment of shots.  The idea of using the colors to mark the video is great because it can help when you are trying to tag certain clips and filter out footage that you don’t need to use at that particular time.  Below I am attaching some  screen shots of a video that I practice using some of the tool bar items on. 
Me playing around with some of the tools in the iMovie tool bar


The screen shots above shows some of my handy dandy work with the tools.  You  can see the window of some of the many different keywords you can select to make changes to your video clips.   A blue bar means a clip has been tagged to fit a category, green bar means the clip is a favorite, orange  bar means the clip has been used, red bar indicates a clip has been rejected from a specific project it does not reject it from the original library which is good to know.  

When creating a project Garrick suggests that when importing your video to stabilize it so it will work after import without stopping.  Join me for segment 3 coming to my blog world friends soon.


PE1_iMovie


Hello my blog world friends, it’s me again, this time I am exploring Lynda.com tutorial on iMovie.   This is my very first post on my beginning journey of iMovie.  Lynda.com is a very powerful site that offers, a lot of online training on software programs and applications that are used on MAC computers. This is exactly what I need because I am very novice to technology. I am not a technology whiz but I do like playing around it different software and trying to figure what I can accomplish. I also like the fact that I can learn how to use different features of the software to create a better end product. I have learned a lot from watching this iMovie tutorial. I am excited to share some of my journey with your today.

Viewing Lynda.com this week, I completed their iMovie ’11 Essential training.  This tutorial was well organized, easy to follow and present a clear message. As I watched course instructor, Garrick Chow, maneuver through this lesson I also attempted to duplicate what he showed.   I earned a certificate in which I emailed to myself to print out later. As I become more comfortable and familiar with all aspects of the software I will add it this skill to my resume.  
My Certificate of Completion! Yes I am so proud of myself.  I can learn.


As part of the lesson requirement I have organized my tutorial into 3 separate blogs for your review.

My first set of tutorials begin here in the home screen of lynda.com. Once I was successful in logging onto Lynda.com and selected the correct iMovie '11 training course, you are greeted by a welcome message from the course instructor.  The next very short video shows you how to check for the latest version of iMovie and  your first page should look similar to this:

This is the course list you can either click on each chapter title to view all videos with in that chapter together or you can select each video separately.  For me it was easier for me to watch the chapters all together. 

This first section of training covered basics level of know on how you can get started by addressing the different types of connections for importing video: 1. tape-based cameras 2. Memory based cameras, 3. digital stills and 5. cell phones and 6. files and discs.  The instructor for this course is Garrick also explains how to convert formats when necessary and capture live action as well.

Garrick explained how the event panes can be used and how to toggle between projects that are in the event library pane. In the project pane you can drag video clips that you want to use in your project. I especially like knowing that iMovie will automatically save any projects you are working on so you don’t have to worry about looking for the save command.

I was amazed to see the advanced tools that became available when you go to iMovie preferences to activate the advanced tools such as favorite tool.  Favorites tool key in iMovie marks your selections with a green like for the footage you want to make your favorite.  I never knew there was an advanced mode before watching this tutorial.  I am extremely excited about my new level of know on yet another software program so I will be sharing some screen shots of me working with this information. 
This is a live shot of me recording myself while selecting favorite from the video  footage made for my Biography .


I really get bloggers, you have to check out iMovie it is awesome!
Stay around for my next blog as I continue my journey to improving my iMovie skills through experiences.